
This article contains affiliate links. I earn from qualifying purchases, at no cost to you. It’s the manufacturer’s way of thanking me for sharing their products with you! Please see our Disclosure Policy for more information.
Growing up, we always received every catalog in the mail known to man. From Ballard Designs to Lands End to Frontgate to Oriental Trading. Going to the mailbox would result in a visual treat, like Christmas for your fantasy life spread across the pages of these well-styled publications. We would pile the catalogs on the kitchen island and I would sit and look through each one, carefully studying the items and admiring the offerings. I used to play a game with myself whereby I would ask if I were forced to buy one thing from each page, what would it be? Sometimes it would be a struggle, while other times I would want everything on each page. Obviously, I never acted on this game, but it’s always fun to escape for a few minutes-much like escaping into the pages of a book.
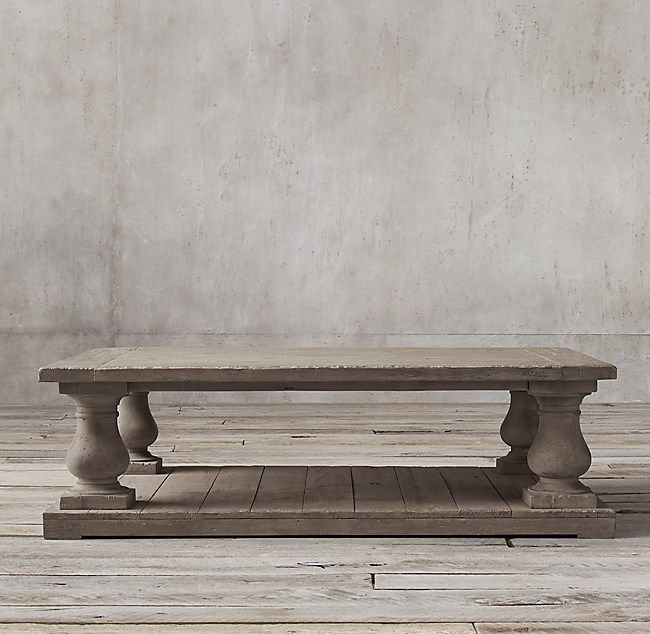
Everyone knows that the most time-consuming and environmentally unfriendly catalog is the one from Restoration Hardware. It barely fits into the mailbox and weighs more than a baby. What a waste of trees (here’s the digital version so you can be environmentally conscious: https://catalogs.restorationhardware.com/BookshelfView/). But damn them, why do they have to make the most beautiful and aesthetically pleasing furniture?! And why is it all so damn expensive?! Clearly, they’re doing something right though, have you seen their stock? But I digress…
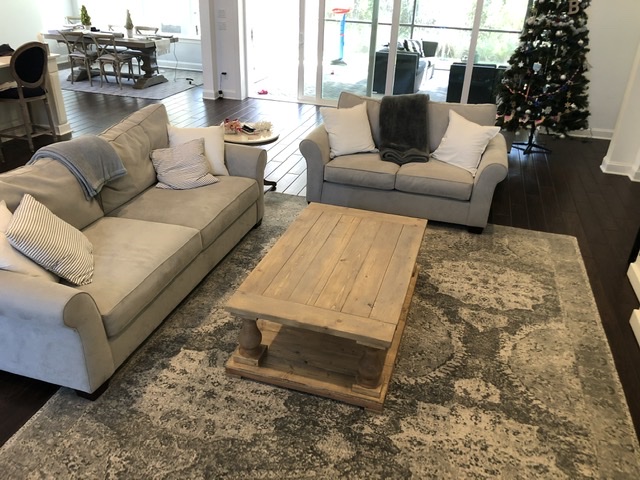
During one of my fantasy catalog browsings, I came across the Restoration Hardware Balustrade Salvaged Wood Coffee Table in salvaged grey. I fell in love immediately.
I knew that if I ever had the opportunity to select another coffee table, I would want one that looked just like this. When we sold our last house, the buyers wanted all of our furniture, so this was my chance. While I loved our previous Ethan Allen coffee table and its coastal look, we discovered that the price of that exact table had increased by 50% since we originally purchased it, so I was excited to potentially get this new RH style. But, I couldn’t justify the price tag. I did tons of googling and tried to find a similar table at a fraction of the cost, but no such luck (I’m picky).
Light bulb! I turned to Pinterest and came across an amazingly talented blogger and a badass DIY chick named Jen Woodhouse. Here is the link to Jen’s table: https://jenwoodhouse.com/diy-restoration-hardware-balustrade-coffee-table-2/
Jen had used plans from Ana White to build the table, which can be found here: https://www.ana-white.com/woodworking-projects/balustrade-coffee-table
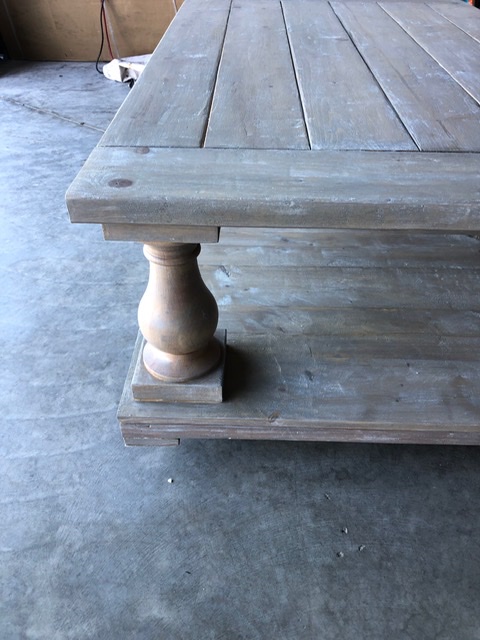
I read through the instructions and decided that I would tackle this project. I partnered with the wonderful folks at Osborne Wood to obtain the coffee table legs, which can be found here: https://www.osbornewood.com/1332.aspx.

Armed with my confidence, I was convinced that I would be able to build this table, as it seemed easy enough. Wrong-o! If you haven’t learned yet, I’m brutally honest. Parts of this DIY project are easy and doable. Other parts require assistance, making the “yourself” part of DIY a group project. Allow me to share with you what I learned from my experience so that you can, in fact, accomplish this table. The plans for the table are linked above, I will simply provide the tips and techniques I personally used based on what I learned during this experience.
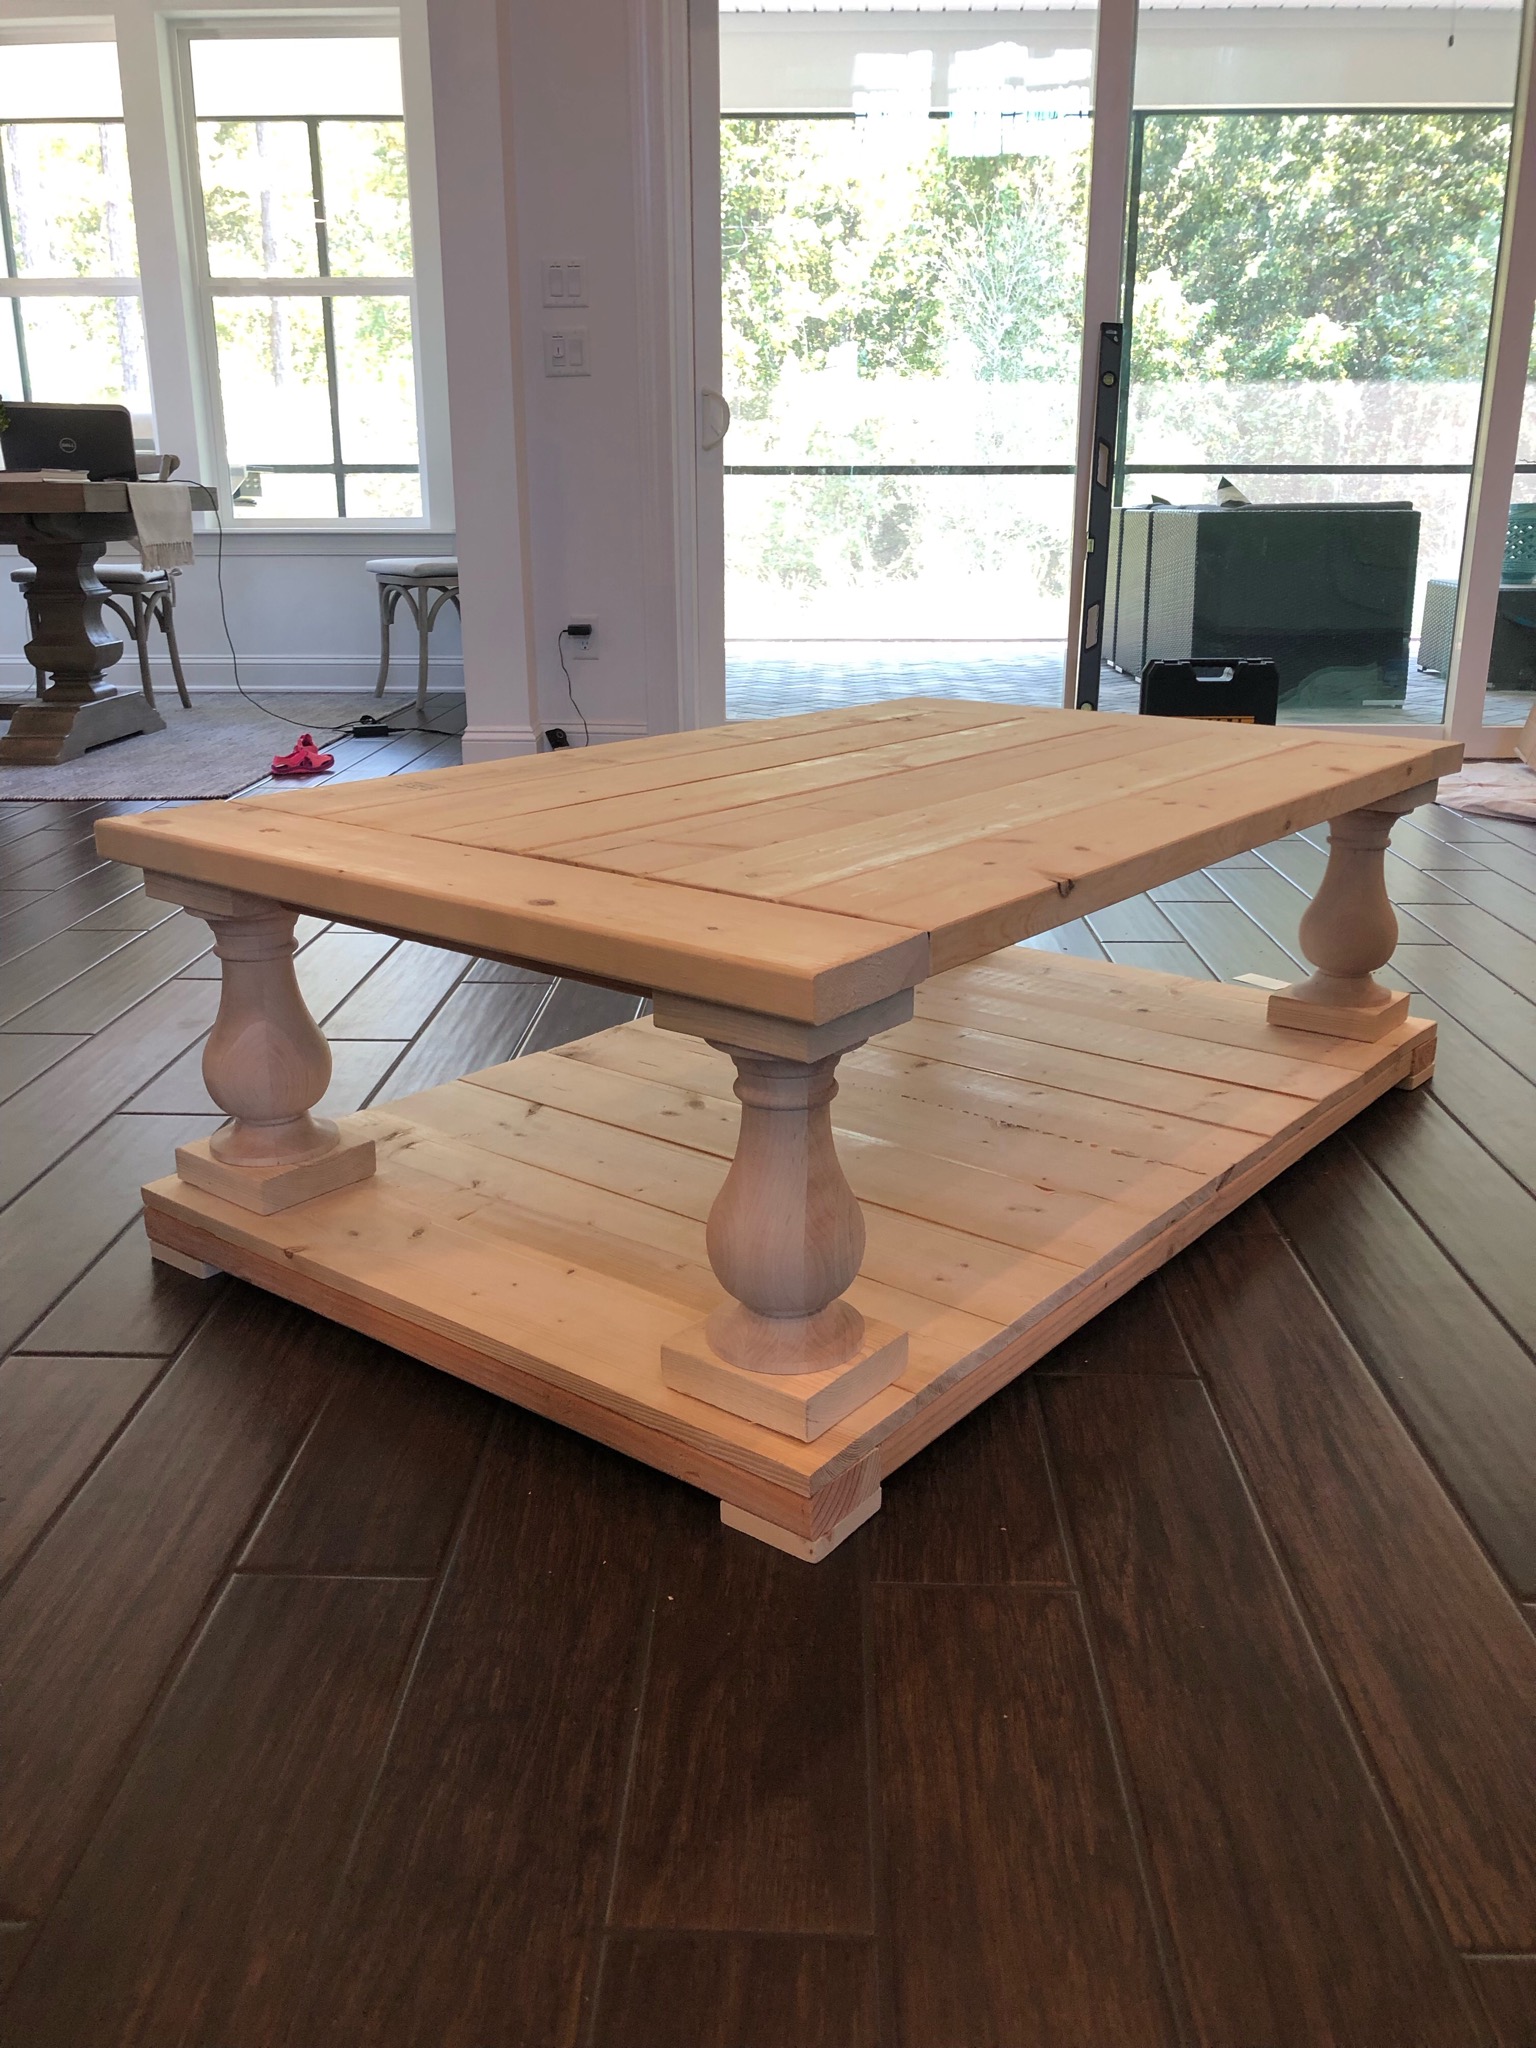
First, I set off to Home Depot and had an extremely knowledgeable and helpful associate assist me with selecting the lumber for this project. I should also add that he was very patient, as I rejected and selected each piece based on knots or other imperfections that I deemed unsuitable for my project. This is all a personal preference. If you want a more rustic look, you can select the pieces with more knots. My biggest concern was selecting pieces of wood that didn’t have splits in them to prevent future wear or splitting. Home Depot will measure and cut the wood down to size for you, which saves a ton of time and effort. Word to the wise: measure each piece after they’ve cut them for you to make sure the cuts are exact and concise. I learned the hard way after I brought them home that a few pieces needed to be re-cut and I had to return to the store to exchange them for new cuts. Luckily, Home Depot is fantastic to work with and very accommodating.
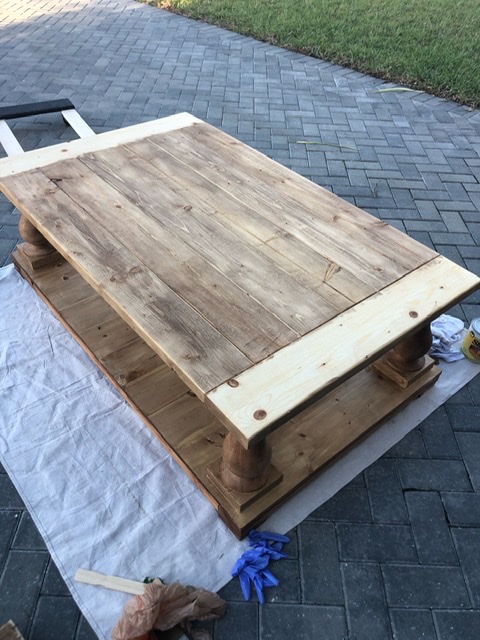
Next, I re-read through all of the instructions so that I had an overall idea of the order of the project. I laid out all of the wood and began assembling the table in the order of the steps. The biggest challenge I encountered was screwing the top and bottom of the table together because the wood was very thick and my drill didn’t have the appropriate torque. This is where my dad’s expertise came in and where we sort of deviated from the instructions. Jen’s instructions say to drill pocket holes on the underside of each plank to secure each plank to the one next to it. Instead of doing pocket holes, we screwed into the underside frame so that each plank had a screw securing the plank to the frame. Because the planks were glued to each other, this was an alternative method to provide the “belt and suspenders” treatment intended by the pocket screws. Both methods work just fine for this purpose.
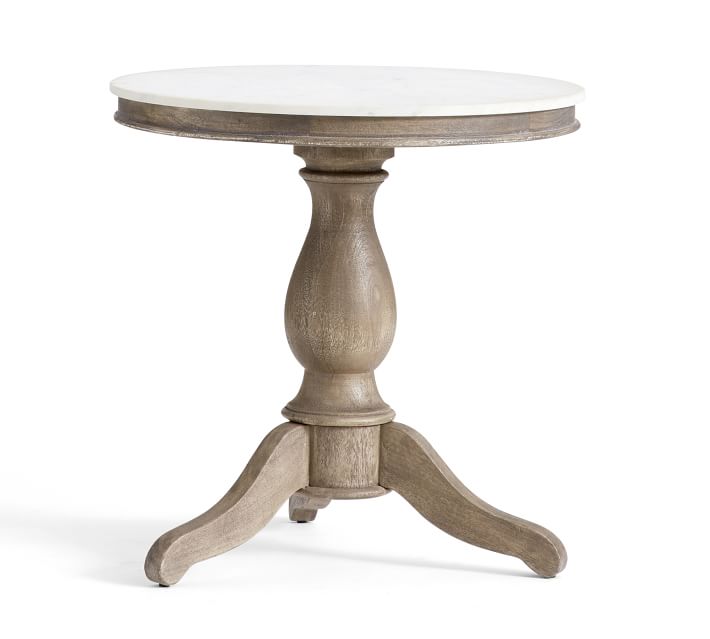
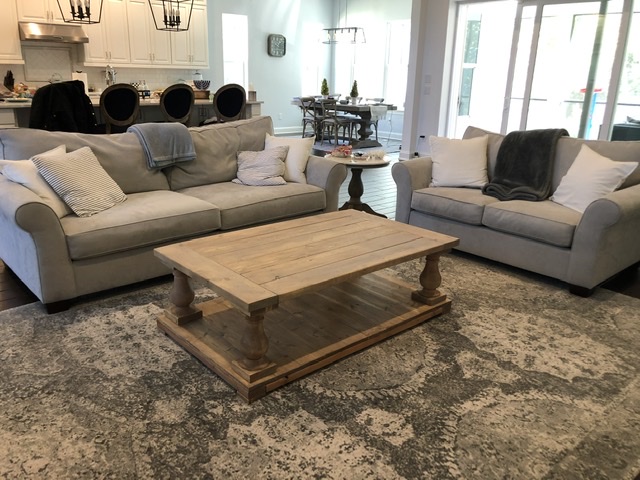
Once the table was assembled, I had the task of staining it. I knew that I wanted the distressed gray color of the RH table. I also wanted to complement the existing Pottery Barn Alexandra side table that is next to our couch.
My goal was to have them complement each other without turning my living room into a matchy-matchy 1950s living room set. I ended up trying three different techniques with different combinations of stains. I am including instructions to the two techniques because both colors are very pretty, one just worked better with the existing furniture in our living room. The second technique is what I ultimately stayed with and how the table looks today.
First Technique
For my first attempt, I sanded the entire table until it was the desired smoothness. It was pretty soft and buttery. I used a combination of a belt sander and a small palm sander to achieve this level of smoothness. I used a leaf blower to make sure all of the sanding dust was off the table. Be sure to invest in a box of rubber gloves; you will go through a lot of them! Your hands get sweaty from manually staining with a rag.
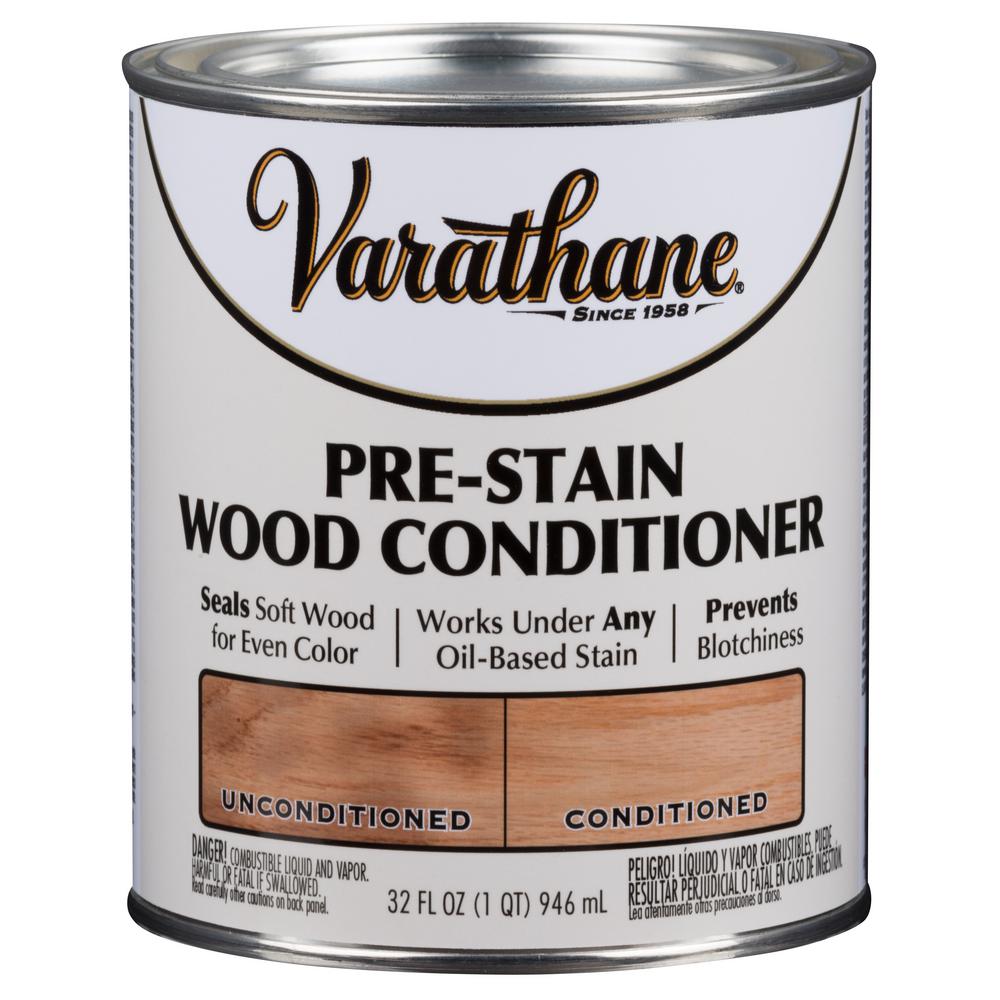
Using a staining brush, I put a coat of pre-stain conditioner from Home Depot on the entire table.
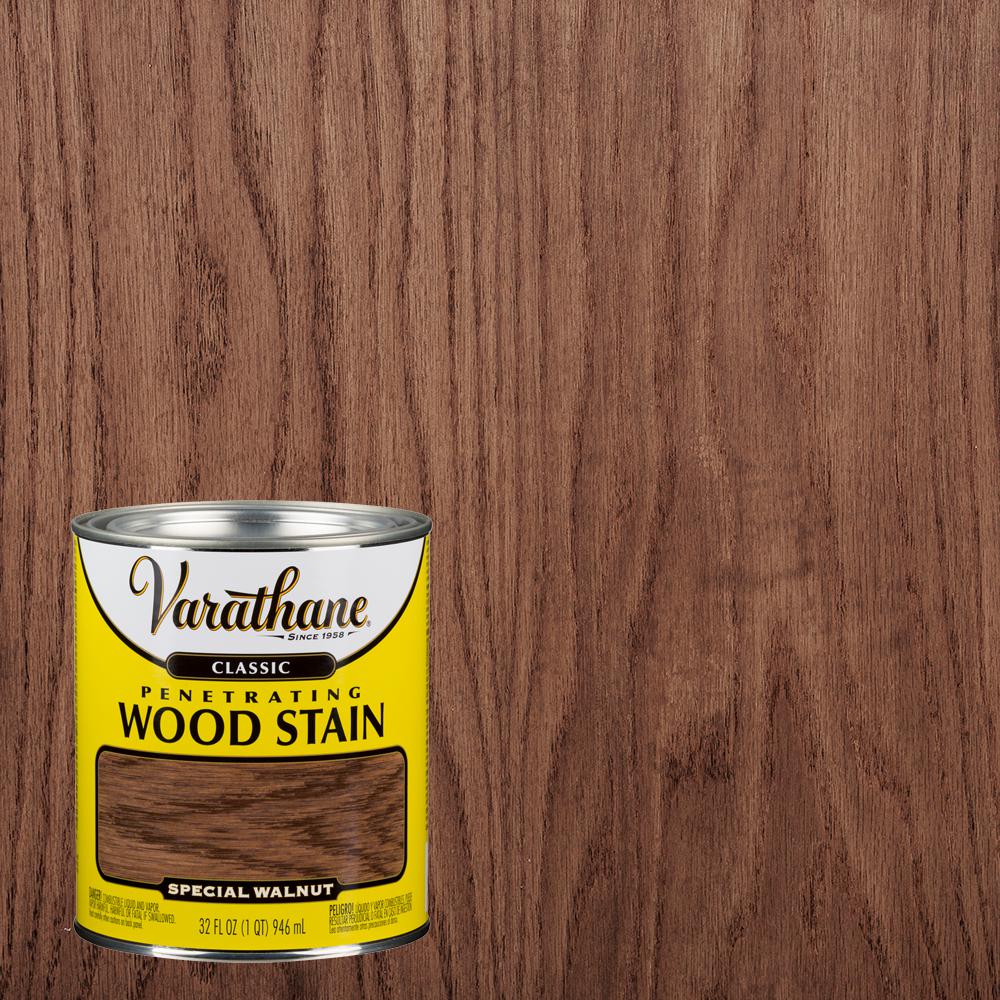
I let the pre-stain conditioner dry for at least 30 minutes before moving onto the staining steps. Using a rag, I applied a uniform coat of special walnut stain from Home Depot to the entire table. I let this stain dry for 2 hours before applying the next coat of stain.
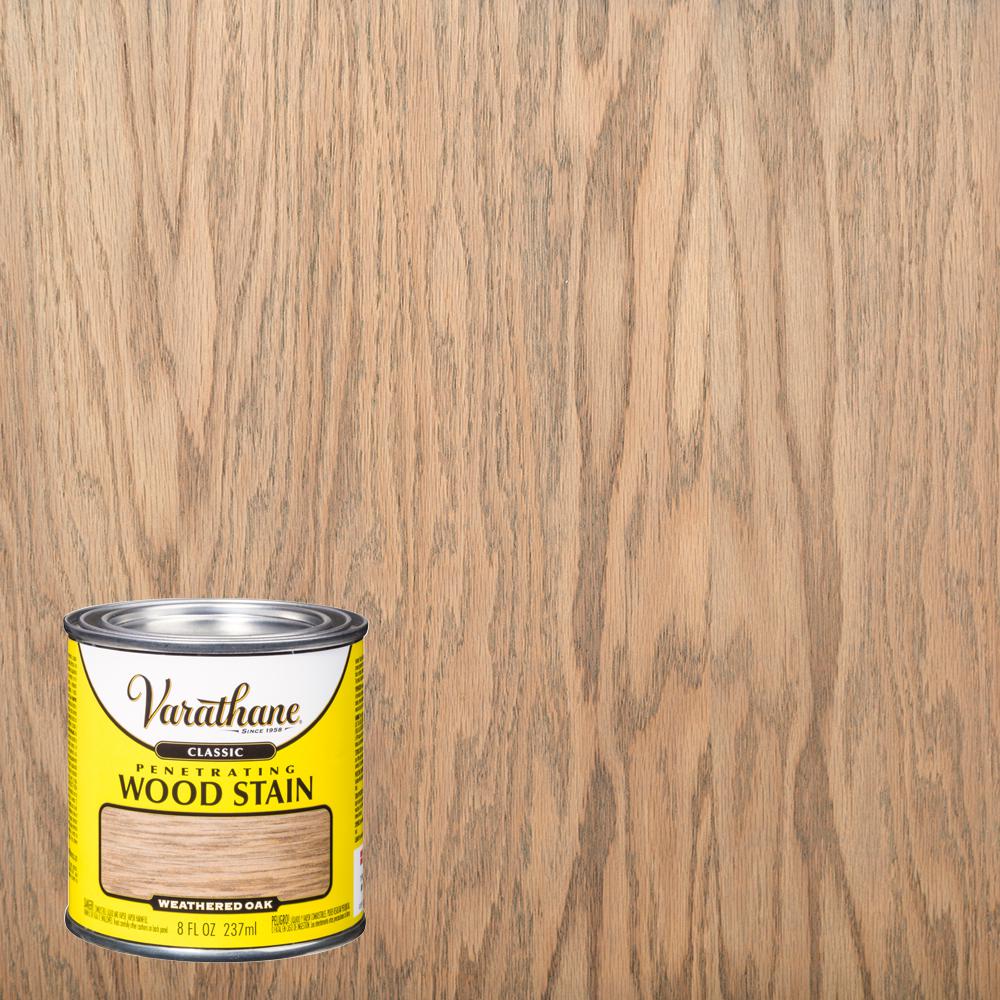
Next, I applied a coat of weathered oak stain from Home Depot with a rag to the table. Once again, I let this coat of stain dry for 2 hours before moving onto the next step.
Once it dried, I applied a very light coat of Benjamin Moore Arborcoat stain in the color Briarwood with a semi-solid finish. I had this custom made at my local Benjamin Moore store. It comes in different finishes and washes. I also ended up buying a can of the Briarwood in the semi-transparent finish because I thought it would have given the desired finish I was going for. I used that on a piece of scrap wood and it was pretty, but I ended up achieving my desired color with the second technique described below.
I allowed the table to sit for 24 hours before shellacking it with clear Zinsser Shellac that can be found at Home Depot. I used a brush to shellac on this first version of the table and allowed it to dry for 24 hours.

Once that was dry, I mixed a combination of Annie Sloan clear wax with a small amount of Benjamin Moore Stone White, which is a very light gray paint.
I applied the wax/paint combo using a rag and allowed the table to dry. It takes 5-20 days for the wax to fully cure, even though it feels dry to the touch almost immediately after application. Here are pictures of the finished product of the first technique in different lighting-both outside and in my house.
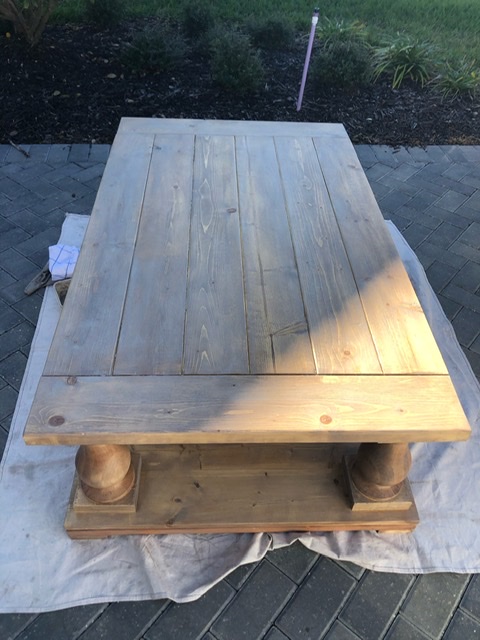
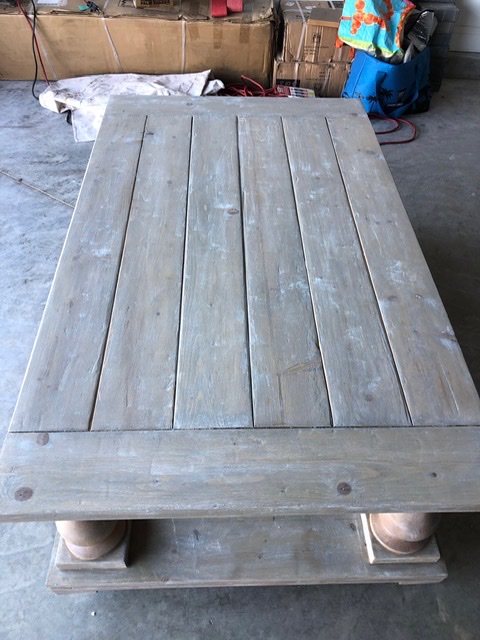
While this combination turned out a beautiful color, it was lacking the gray-wash look that I was going for. It also didn’t look as uniformly applied as I had intended, and that was primarily due to the fact that the table consisted of three different types of wood.
Second Technique
I sanded off the wax layer and decided to add a more generous application of the Benjamin Moore stain. Big mistake! It looked like a gray painted table. (I deliberately didn’t take any pictures of the table at this phase because it was too ugly to document!). At this point, I was really frustrated and disappointed. I decided to walk away from the table for a few days because I knew that if I continued to keep experimenting, I would be more frustrated and regret ever building the table. I would be rushing through my attempts just to get it done and I knew it wouldn’t turn out the way I intended. Time apart was just what we needed.
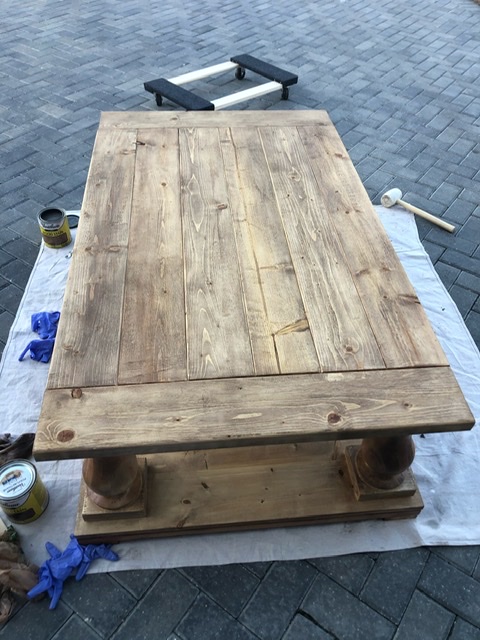
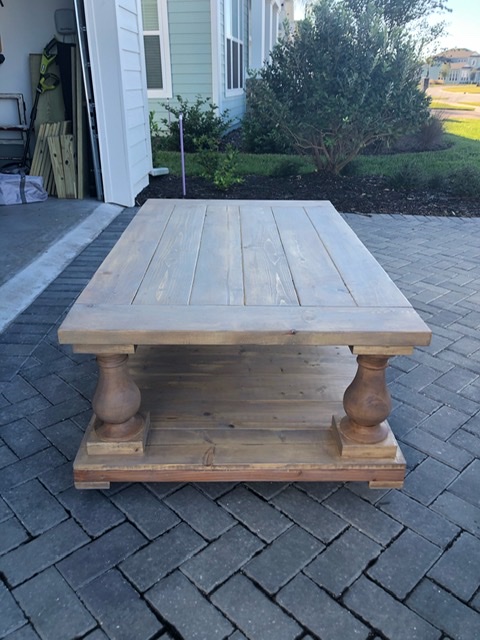
I revisited the table and decided to take a belt sander to the entire thing. I sanded it down to the raw wood. I used coarse grit sandpaper and the texture of the table went from buttery smooth to grainy and distressed looking. I liked where this was headed. I started from scratch, but this time I ditched all brushes and kept the application solely to rags. These were the steps I took to achieve the finished product:
- I applied the pre-stain conditioner and let it dry for 30 minutes.
- I applied 3 coats of weathered oak, allowing each coat to dry for 2 hours before adding more stain. You’ll notice that I ditched the special walnut color. The weathered oak gave it the gray wash that I was looking for, and it literally weathered the wood upon immediate application without a brown undertone. You can add as many or as few coats of this stain as you’d like, depending on the desired look. Three was the magic number for my purposes.
- I shellacked the entire table with a rag and allowed it to dry for 24 hours.
- I combined the Annie Sloan clear wax with Benjamin Moore Super White paint instead of the original light gray paint, and applied evenly. Because the table was now more grainy, the white wax sunk into the grooves, giving it a much better looking distressed and gray-washed table. Finally!
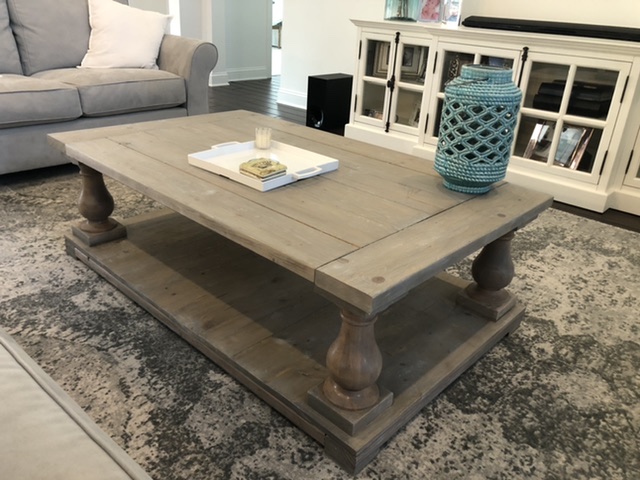
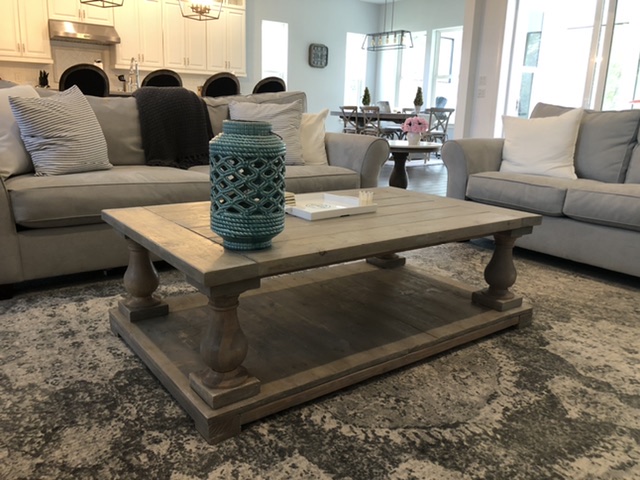
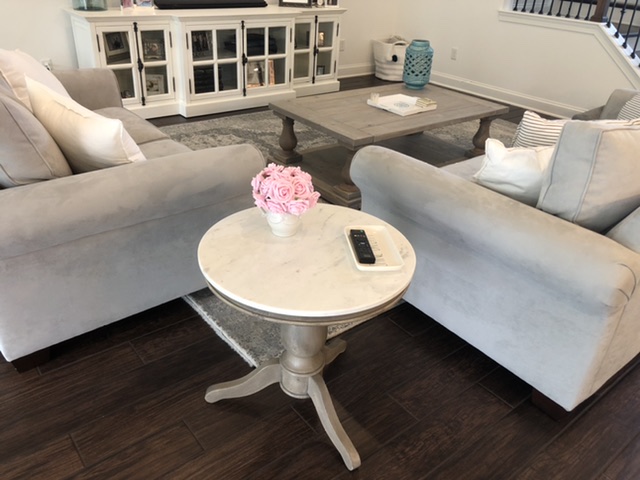
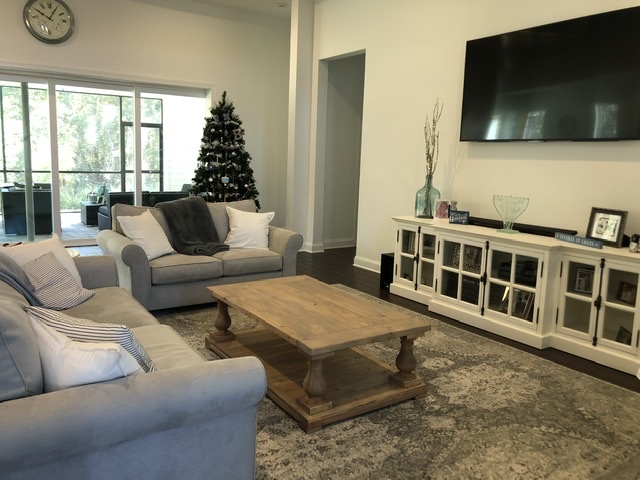
I couldn’t be happier with the finished table! The stain color is exactly what I was hoping it would look like and is reallllllly close to matching the color of the Pottery Barn side table, without it looking like a matching set. I also like how the gray wash coordinates with the color of the couch and the rug. It was well worth the effort.
After the table was completely dry, I cut these felt pads to fit and stuck them on the feet to protect the rug that the table is resting on.

Let me know if you end up using one of these stains and how it turns out, I’d love to see your finished product!
Tamar Blazer is an attorney-turned-twin mom, with a passion for her family, friends, writing, good food, home decor and laughing. When she’s not lamenting on her lack of sleep, you can find her doing one of the too many projects she likes to take on, usually with a twin on either side.